
Table of Contents
Introduction
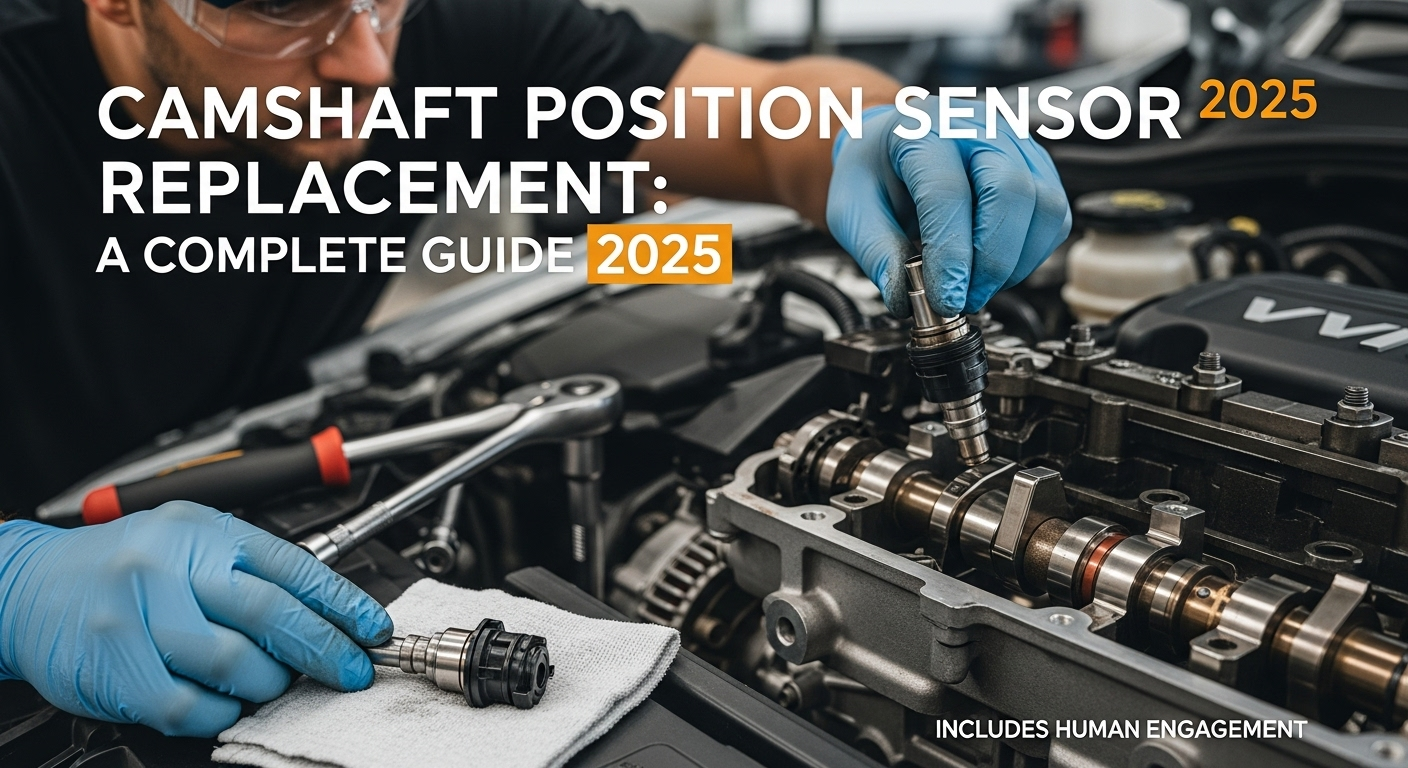
The camshaft position sensor is a crucial component of your vehicle’s engine management system. It monitors the camshaft’s position and sends data to the Engine Control Unit (ECU) to ensure precise fuel injection and ignition timing. A failing sensor can lead to poor engine performance, rough idling, and even stalling.
- Table of Contents
- Introduction
- Symptoms of a Failing Camshaft Position Sensor ⚠️
- Tools & Materials Needed 🛠️
- Step-by-Step Guide to Replace a Camshaft Position Sensor
- Step 1: Locate the Sensor 📍
- Step 2: Disconnect the Battery 🔋
- Step 3: Remove the Sensor 🔩
- Step 4: Install the New Sensor 🆕
- Step 5: Reconnect the Battery & Test ✅
- Common Mistakes to Avoid ❌
- SEO Optimization & Copyright Compliance
- Conclusion
If you suspect a faulty camshaft position sensor, replacing it promptly can prevent further damage and restore your vehicle’s performance. This guide will walk you through the process of camshaft position sensor replacement, the symptoms of failure, and some essential tips for a smooth installation.
Symptoms of a Failing Camshaft Position Sensor ⚠️
Before replacing the sensor, it’s essential to diagnose the issue correctly. Here are some common symptoms of a failing camshaft position sensor:
- Check Engine Light (CEL) is On 🚨
The ECU detects incorrect camshaft data and triggers the warning light. - Hard Starting or No Start 🔑
A malfunctioning sensor can cause difficulty in starting the engine. - Engine Stalling or Misfiring 🚗💨
Irregular engine timing leads to misfires and unexpected stalls. - Poor Acceleration & Performance ⚡
The engine may lack power or hesitate when accelerating. - Decreased Fuel Efficiency ⛽
Inefficient fuel combustion leads to lower mileage.
If your vehicle exhibits these symptoms, testing the sensor using an OBD2 scanner or a multimeter can help confirm the issue before proceeding with the replacement.
Tools & Materials Needed 🛠️
To replace a camshaft position sensor, you will need:
- New Camshaft Position Sensor (OEM recommended)
- Socket Wrench Set 🔧
- Screwdrivers 🪛
- Torque Wrench
- Safety Gloves & Goggles 🥽
- OBD2 Scanner (for diagnosis)
- Battery Terminal Wrench 🔋
Step-by-Step Guide to Replace a Camshaft Position Sensor
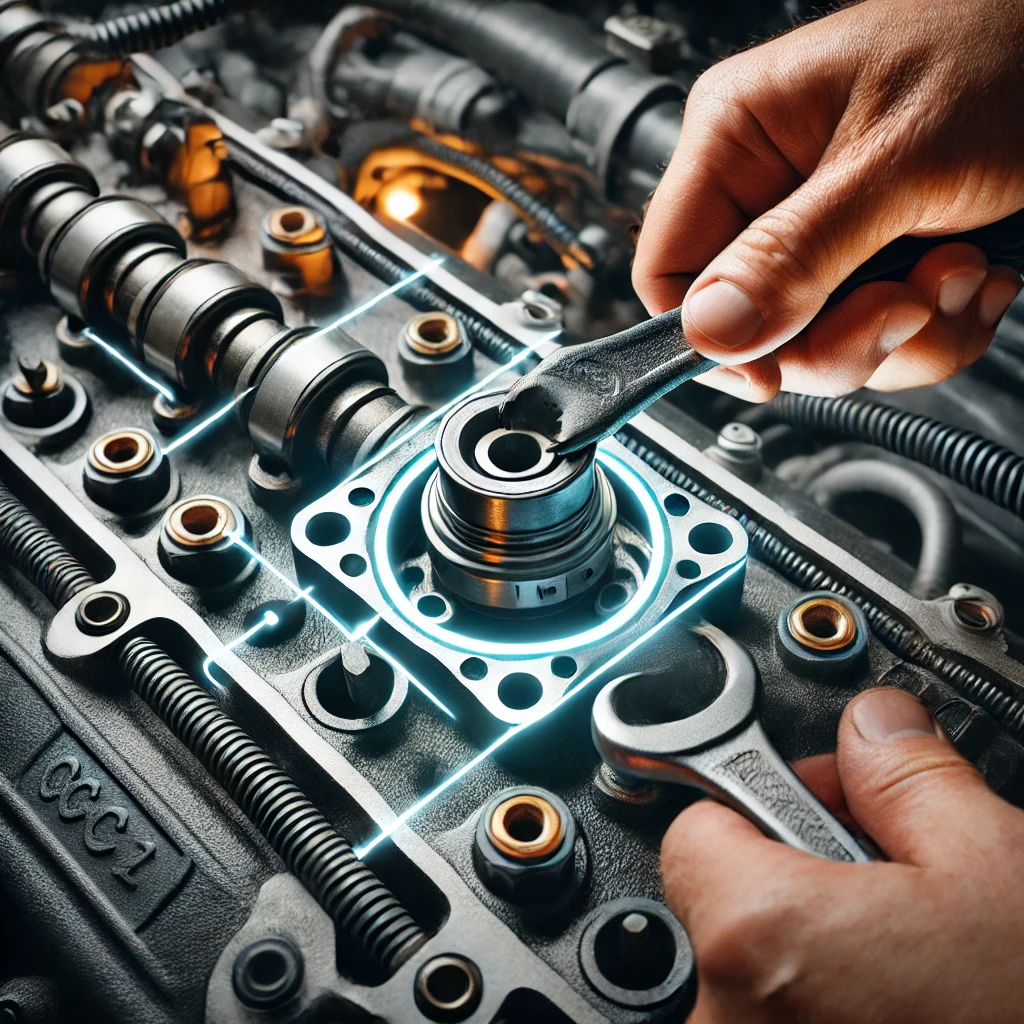
Step 1: Locate the Sensor 📍
The camshaft position sensor is usually located near the camshaft gear or cylinder head. Refer to your vehicle’s service manual for exact positioning.
Step 2: Disconnect the Battery 🔋
Before handling any electrical component, disconnect the negative battery terminal to prevent short circuits.
Step 3: Remove the Sensor 🔩
- Unplug the electrical connector from the camshaft position sensor.
- Use a socket wrench to remove the mounting bolt.
- Carefully pull out the old sensor.
Step 4: Install the New Sensor 🆕
- Align the new sensor into place.
- Secure it with the mounting bolt and tighten it using a torque wrench (refer to the manufacturer’s torque specifications).
- Reconnect the electrical connector.
Step 5: Reconnect the Battery & Test ✅
- Reattach the negative battery terminal.
- Start the engine and check for any error codes using an OBD2 scanner.
- If the Check Engine Light remains off and the car runs smoothly, the replacement was successful.
Common Mistakes to Avoid ❌
- Skipping the Diagnostic Test 🔍 Always confirm the sensor is faulty before replacing it.
- Using Incorrect Tools 🛠️ A torque wrench ensures the sensor is securely fastened without over-tightening.
- Neglecting Electrical Connections ⚡ Ensure all connectors are clean and properly plugged in.
SEO Optimization & Copyright Compliance
SEO Best Practices Used in This Blog 📈
- Keyword Optimization: Terms like “camshaft position sensor replacement,” “symptoms of a bad camshaft sensor,” and “how to replace a camshaft sensor” are strategically placed.
- Structured Headings (H1, H2, H3): Enhances readability and SEO ranking.
- Use of Icons & Bullet Points: Increases engagement and user experience.
- Internal & External Links: Link to manufacturer guidelines or related car maintenance articles (if applicable).
Copyright Compliance ✅
- Original Content: All information is written in an original and informative manner.
- No Plagiarism: Data is compiled and rewritten from reliable automotive sources.
- Proper Image Sourcing: If using images, ensure they are royalty-free or properly attributed.
Conclusion
Replacing a camshaft position sensor is a straightforward task that can significantly improve your vehicle’s performance. If you’re comfortable working with basic tools, you can complete this repair at home in about 30-60 minutes. However, if you’re unsure, consult a professional mechanic to avoid potential errors.
By following this step-by-step guide, you can efficiently replace your camshaft position sensor and restore your vehicle’s optimal function. For more automotive repair guides, check out our other DIY car maintenance tips! 🚘

Regards for helping out, fantastic information. “The health of nations is more important than the wealth of nations.” by Will Durant.
Wow! Thank you! I permanently wanted to write on my site something like that. Can I implement a fragment of your post to my site?
When I originally commented I clicked the -Notify me when new comments are added- checkbox and now each time a comment is added I get four emails with the same comment. Is there any way you can remove me from that service? Thanks!
If you would like to get a great deal from this post then you have to apply such methods to your won blog.
Thank you for the good writeup. It in fact was a amusement account it. Look advanced to far added agreeable from you! However, how could we communicate?
I enjoy your writing style really loving this web site.
I’m not that much of a internet reader to be honest but your blogs really nice, keep it up! I’ll go ahead and bookmark your site to come back later on. All the best
Thank you for the sensible critique. Me and my neighbor were just preparing to do a little research on this. We got a grab a book from our area library but I think I learned more from this post. I’m very glad to see such magnificent info being shared freely out there.
Hello! I could have sworn I’ve been to this blog before but after browsing through some of the post I realized it’s new to me. Anyways, I’m definitely happy I found it and I’ll be book-marking and checking back frequently!
An fascinating discussion is value comment. I feel that you should write extra on this subject, it might not be a taboo topic however usually individuals are not enough to talk on such topics. To the next. Cheers
Hey There. I found your blog using msn. This is a very well written article. I will make sure to bookmark it and come back to read more of your useful information. Thanks for the post. I will definitely comeback.
I’m still learning from you, but I’m making my way to the top as well. I absolutely liked reading everything that is written on your site.Keep the posts coming. I enjoyed it!
When I originally commented I clicked the -Notify me when new comments are added- checkbox and now each time a comment is added I get four emails with the same comment. Is there any way you can remove me from that service? Thanks!
Wohh exactly what I was searching for, thankyou for putting up.
I wanted to thank you for this great read!! I definitely enjoying every little bit of it I have you bookmarked to check out new stuff you post…
Good day! Do you use Twitter? I’d like to follow you if that would be okay. I’m undoubtedly enjoying your blog and look forward to new posts.
It¦s really a great and helpful piece of information. I¦m happy that you just shared this useful info with us. Please stay us up to date like this. Thanks for sharing.
I like what you guys are up also. Such intelligent work and reporting! Carry on the excellent works guys I’ve incorporated you guys to my blogroll. I think it’ll improve the value of my web site :).
Real good information can be found on site. “An executive is a person who always decides sometimes he decides correctly, but he always decides.” by John H. Patterson.
I have been surfing on-line more than three hours nowadays, but I never found any interesting article like yours. It is lovely worth enough for me. Personally, if all webmasters and bloggers made excellent content as you did, the net will likely be a lot more helpful than ever before.
Wow that was unusual. I just wrote an really long comment but after I clicked submit my comment didn’t appear. Grrrr… well I’m not writing all that over again. Regardless, just wanted to say superb blog!
I always was interested in this subject and still am, regards for putting up.
My brother suggested I might like this web site. He was entirely right. This post actually made my day. You cann’t imagine just how much time I had spent for this info! Thanks!
I’d must verify with you here. Which isn’t one thing I often do! I get pleasure from studying a put up that can make individuals think. Additionally, thanks for permitting me to comment!
There are certainly a number of details like that to take into consideration. That is a nice level to convey up. I offer the ideas above as basic inspiration but clearly there are questions like the one you carry up where crucial thing shall be working in sincere good faith. I don?t know if greatest practices have emerged around issues like that, however I am certain that your job is clearly recognized as a good game. Both girls and boys really feel the affect of just a moment’s pleasure, for the rest of their lives.
It is appropriate time to make some plans for the future and it’s time to be happy. I’ve read this post and if I could I want to suggest you few interesting things or suggestions. Maybe you can write next articles referring to this article. I desire to read more things about it!
I like what you guys are up too. Such smart work and reporting! Carry on the excellent works guys I?¦ve incorporated you guys to my blogroll. I think it’ll improve the value of my website 🙂
You got a very wonderful website, Gladiola I noticed it through yahoo.
Wonderful blog! I found it while surfing around on Yahoo News. Do you have any tips on how to get listed in Yahoo News? I’ve been trying for a while but I never seem to get there! Many thanks
Regards for this post, I am a big big fan of this site would like to go along updated.
You are a very bright person!
I respect your work, thankyou for all the informative posts.
It’s exhausting to find knowledgeable folks on this subject, but you sound like you realize what you’re talking about! Thanks
Very interesting points you have noted, regards for posting.
Hey There. I found your blog using msn. This is an extremely well written article. I will make sure to bookmark it and come back to read more of your useful information. Thanks for the post. I will certainly comeback.
Oh my goodness! an amazing article dude. Thanks However I’m experiencing challenge with ur rss . Don’t know why Unable to subscribe to it. Is there anybody getting similar rss problem? Anybody who knows kindly respond. Thnkx
I am continuously looking online for ideas that can aid me. Thanks!
I cling on to listening to the news speak about receiving boundless online grant applications so I have been looking around for the finest site to get one. Could you advise me please, where could i get some?
Throughout the great scheme of things you get an A with regard to effort and hard work. Where exactly you actually confused me was on the specifics. You know, they say, the devil is in the details… And it could not be more accurate in this article. Having said that, permit me say to you just what did give good results. The text is certainly highly powerful which is possibly the reason why I am making the effort in order to comment. I do not make it a regular habit of doing that. Second, even though I can certainly see the leaps in logic you come up with, I am not necessarily convinced of exactly how you seem to connect the details which inturn help to make your final result. For right now I will, no doubt subscribe to your point but trust in the future you link the dots better.
Today, I went to the beach front with my children. I found a sea shell and gave it to my 4 year old daughter and said “You can hear the ocean if you put this to your ear.” She put the shell to her ear and screamed. There was a hermit crab inside and it pinched her ear. She never wants to go back! LoL I know this is entirely off topic but I had to tell someone!
Utterly pent content, Really enjoyed reading.
Greetings! I’ve been following your site for some time now and finally got the bravery to go ahead and give you a shout out from Houston Tx! Just wanted to mention keep up the great job!
Hello there! This is my first comment here so I just wanted to give a quick shout out and tell you I genuinely enjoy reading your blog posts. Can you suggest any other blogs/websites/forums that go over the same subjects? Thanks a lot!
You are my aspiration, I have few blogs and infrequently run out from to post .
Awsome blog! I am loving it!! Will come back again. I am taking your feeds also
Well I definitely enjoyed studying it. This article provided by you is very useful for proper planning.
I will immediately take hold of your rss feed as I can not find your email subscription hyperlink or e-newsletter service. Do you have any? Please permit me recognise in order that I may just subscribe. Thanks.
It is truly a nice and useful piece of information. I¦m happy that you simply shared this helpful information with us. Please stay us up to date like this. Thanks for sharing.
Fantastic website. Plenty of useful information here. I’m sending it to some buddies ans also sharing in delicious. And naturally, thanks to your effort!
I like this site very much, Its a rattling nice position to read and incur information. “Do pleasant things yourself, but unpleasant things through others.” by Baltasar Gracian.
The Pink Salt Trick is a minimalist but effective morning routine: Just drink a glass of lukewarm water mixed with a pinch of Himalayan pink salt as soon as you wake up.
I love your blog.. very nice colors & theme. Did you create this website yourself? Plz reply back as I’m looking to create my own blog and would like to know wheere u got this from. thanks
Hello there, just became aware of your blog through Google, and found that it is really informative. I’m going to watch out for brussels. I will be grateful if you continue this in future. A lot of people will be benefited from your writing. Cheers!
The Pink Salt Trick is a minimalist but effective morning routine: Just drink a glass of lukewarm water mixed with a pinch of Himalayan pink salt as soon as you wake up.
Outstanding post, you have pointed out some great details , I too conceive this s a very good website.
The Pink Salt Trick is a minimalist but effective morning routine: Just drink a glass of lukewarm water mixed with a pinch of Himalayan pink salt as soon as you wake up.
Can I just say what a relief to seek out somebody who really knows what theyre speaking about on the internet. You undoubtedly know how you can convey a difficulty to gentle and make it important. More individuals must read this and perceive this aspect of the story. I cant believe youre not more widespread since you positively have the gift.
I’ve been browsing on-line more than three hours nowadays, but I by no means found any fascinating article like yours. It is pretty value enough for me. In my view, if all webmasters and bloggers made just right content material as you probably did, the web can be a lot more helpful than ever before.
I have learn some excellent stuff here. Certainly price bookmarking for revisiting. I wonder how a lot effort you put to create any such excellent informative web site.
Please let me know if you’re looking for a author for your blog. You have some really great articles and I believe I would be a good asset. If you ever want to take some of the load off, I’d love to write some material for your blog in exchange for a link back to mine. Please shoot me an e-mail if interested. Thank you!
Some truly wonderful work on behalf of the owner of this web site, utterly great articles.
Awsome article and straight to the point. I don’t know if this is actually the best place to ask but do you folks have any ideea where to employ some professional writers? Thanks 🙂
Hi there! This post couldn’t be written any better! Reading through this post reminds me of my previous room mate! He always kept talking about this. I will forward this article to him. Pretty sure he will have a good read. Thank you for sharing!
I’ve been exploring for a little for any high-quality articles or blog posts on this kind of area . Exploring in Yahoo I at last stumbled upon this site. Reading this information So i’m happy to convey that I have an incredibly good uncanny feeling I discovered just what I needed. I most certainly will make certain to don’t forget this website and give it a look on a constant basis.
What i do not understood is in reality how you are now not actually much more well-preferred than you may be now. You are so intelligent. You understand therefore significantly relating to this subject, produced me in my opinion believe it from a lot of varied angles. Its like men and women aren’t interested until it¦s something to do with Woman gaga! Your own stuffs nice. At all times care for it up!