

- Table of Contents
- Why Reset the Crankshaft Position Sensor?
- How to Reset the Crankshaft Position Sensor
- Method 1: Using an OBD-II Scanner
- Step 1: Locate the OBD-II Port
- Step 2: Connect the Scanner
- Step 3: Read the Error Codes
- Step 4: Clear the Codes
- Step 5: Start the Engine
- Method 2: Manual Reset Without a Scanner
- Step 1: Disconnect the Battery
- Step 2: Wait for 15-30 Minutes
- Step 3: Reconnect the Battery
- Step 4: Turn on the Ignition
- Step 5: Start the Engine
- Method 3: Driving Relearn Process
- Additional Tips
- Conclusion
Table of Contents
The crankshaft position sensor (CKP) is a crucial component of a vehicle’s engine management system. It monitors the position and speed of the crankshaft and sends this information to the engine control module (ECM) to ensure optimal performance. If your vehicle is experiencing starting issues, misfires, or poor acceleration, resetting or reprogramming the crankshaft position sensor may be necessary. In this guide, we’ll walk you through the steps to reset the sensor properly.
Why Reset the Crankshaft Position Sensor?
Over time, the CKP sensor can malfunction due to dirt, electrical issues, or wear and tear. Resetting it can help in the following situations:
- Engine stalling or misfiring
- Poor fuel efficiency
- Check engine light is on
- Difficulty starting the car
- Rough idling
Before proceeding with the reset, ensure that the sensor is not physically damaged. If it’s defective, resetting it won’t solve the issue, and a replacement may be required.
How to Reset the Crankshaft Position Sensor
Resetting the crankshaft position sensor depends on the make and model of your vehicle. Here are the general steps:
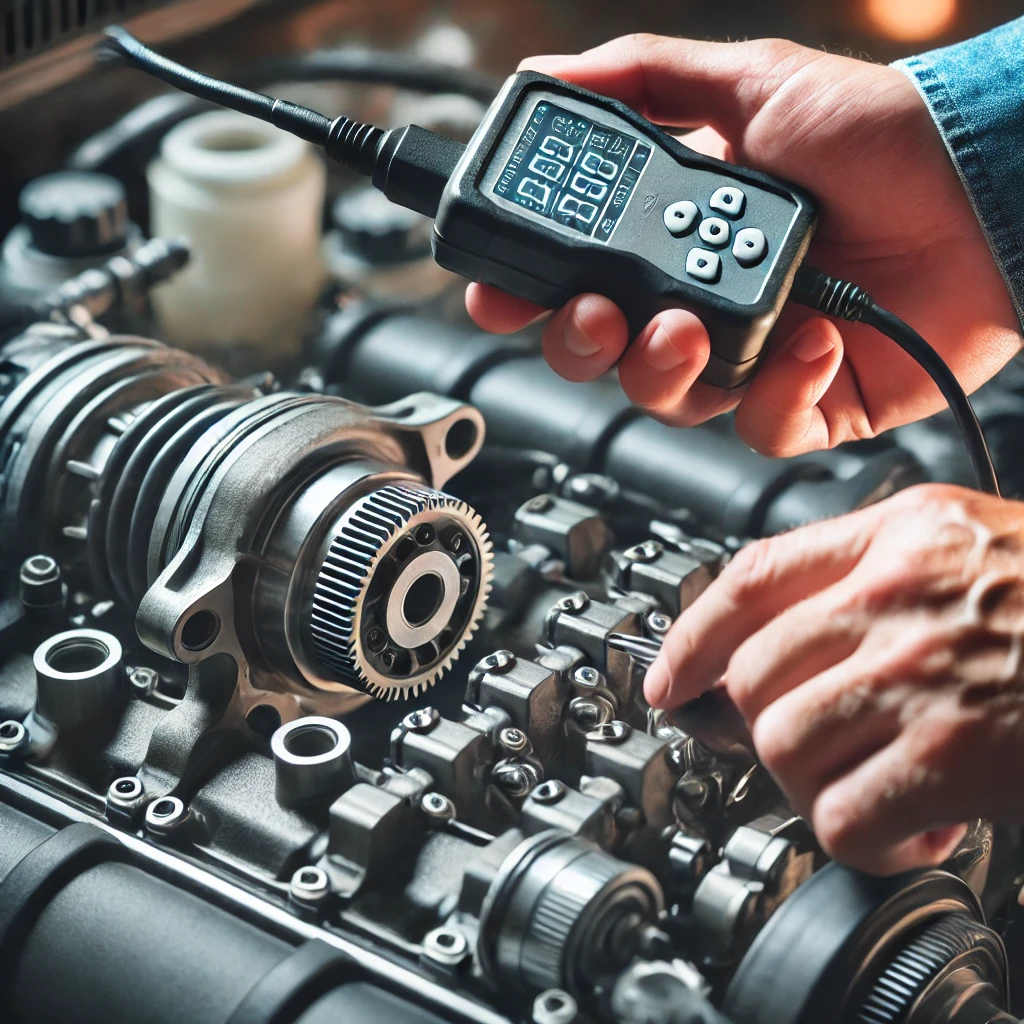
Method 1: Using an OBD-II Scanner
This method is the most effective and recommended way to reset the sensor.
Step 1: Locate the OBD-II Port
The OBD-II port is typically found beneath the dashboard, near the driver’s seat.
Step 2: Connect the Scanner
Plug the OBD-II scanner into the port and turn on the ignition without starting the engine.
Step 3: Read the Error Codes
Use the scanner to check for any fault codes related to the crankshaft position sensor (such as P0335 or P0336). If a code is present, proceed to clear it.
Step 4: Clear the Codes
Using the scanner, erase the error codes and reset the sensor. Once completed, turn off the ignition and unplug the scanner.
Step 5: Start the Engine
Start the vehicle and let it idle for a few minutes. If the check engine light stays off and the vehicle runs smoothly, the reset was successful.
Method 2: Manual Reset Without a Scanner
If you don’t have access to an OBD-II scanner, you can try a manual reset.
Step 1: Disconnect the Battery
Turn off the vehicle and disconnect the negative terminal of the battery. This will help reset the ECM and the sensor.
Step 2: Wait for 15-30 Minutes
Leave the battery disconnected for at least 15 minutes to allow the ECM to reset fully.
Step 3: Reconnect the Battery
Reconnect the negative battery terminal and tighten it securely.
Step 4: Turn on the Ignition
Switch the ignition to the “ON” position without starting the engine. Let it sit for about 5 minutes to allow the ECM to recalibrate.
Step 5: Start the Engine
Turn the key to start the engine. Let it idle and check for any unusual behavior. If the issue persists, a deeper diagnostic may be needed.
Method 3: Driving Relearn Process
Some vehicles require a driving relearn process to reset the crankshaft position sensor.
Step 1: Start the Engine and Let It Idle
Allow the car to idle for about 5 minutes.
Step 2: Drive at a Constant Speed
Drive the vehicle at a steady speed of around 40-50 mph for 10-15 minutes.
Step 3: Stop and Restart
Turn off the engine, wait a few minutes, and restart the vehicle. If the sensor was successfully reset, performance issues should be resolved.
Additional Tips
- Check for Wiring Issues: If the sensor continues to malfunction, inspect the wiring and connectors for damage or corrosion.
- Perform a Full System Scan: Use an advanced scanner to check for other related sensor faults.
- Consider a Professional Mechanic: If resetting doesn’t work, the sensor may need to be replaced, or the vehicle may require a more in-depth diagnostic.
Conclusion
Resetting the crankshaft position sensor can resolve various engine performance problems, but it should be done correctly. Using an OBD-II scanner is the most reliable method, but manual resets and driving relearn procedures can also be effective. If the issue persists after a reset, further inspection or sensor replacement may be necessary. For more automotive repair guides, visit OnlyMechanic.com and stay updated with the latest expert tips and solutions!


Good write-up, I am normal visitor of one’s site, maintain up the excellent operate, and It is going to be a regular visitor for a long time.
Hello, Neat post. There is a problem along with your website in web explorer, may test thisK IE still is the market chief and a good component to folks will miss your great writing because of this problem.
you have a great blog here! would you like to make some invite posts on my blog?
I precisely wished to appreciate you once again. I am not sure the things I could possibly have created without those solutions revealed by you relating to such a theme. It was actually the difficult scenario in my view, however , considering your skilled approach you resolved it made me to cry with contentment. Extremely thankful for your information and as well , expect you are aware of a powerful job you’re undertaking educating most people by way of your webblog. I’m certain you’ve never encountered all of us.
I genuinely enjoy looking through on this internet site, it has got superb content. “The secret of eternal youth is arrested development.” by Alice Roosevelt Longworth.
It is actually a great and useful piece of information. I?¦m happy that you simply shared this useful information with us. Please stay us informed like this. Thanks for sharing.
Great web site. A lot of helpful information here. I am sending it to several buddies ans additionally sharing in delicious. And obviously, thank you in your sweat!
Saved as a favorite, I really like your blog!
Hey There. I found your blog using msn. This is an extremely well written article. I’ll make sure to bookmark it and come back to read more of your useful info. Thanks for the post. I’ll definitely return.
Thank you for any other informative website. Where else may I get that type of info written in such an ideal approach? I have a venture that I am simply now running on, and I have been on the glance out for such information.
You are my breathing in, I have few web logs and rarely run out from to brand : (.
Very instructive and wonderful anatomical structure of subject matter, now that’s user pleasant (:.
Hello! I just would like to give a huge thumbs up for the great info you have here on this post. I will be coming back to your blog for more soon.
I am constantly looking online for tips that can help me. Thx!
Aw, this was a very nice post. In thought I want to put in writing like this moreover – taking time and actual effort to make a very good article… but what can I say… I procrastinate alot and not at all appear to get one thing done.
I have recently started a website, the info you offer on this web site has helped me tremendously. Thank you for all of your time & work.
I’d have to examine with you here. Which is not one thing I usually do! I take pleasure in reading a post that may make folks think. Additionally, thanks for permitting me to comment!
Thanks for helping out, superb info. “The health of nations is more important than the wealth of nations.” by Will Durant.
Unquestionably believe that which you stated. Your favorite reason appeared to be on the net the easiest thing to be aware of. I say to you, I definitely get annoyed while people think about worries that they just don’t know about. You managed to hit the nail upon the top and defined out the whole thing without having side-effects , people could take a signal. Will probably be back to get more. Thanks
I’m still learning from you, but I’m improving myself. I certainly liked reading everything that is posted on your blog.Keep the aarticles coming. I enjoyed it!
Some truly good info , Gladiola I observed this. “Things we not hope for often come to pass than things we wish.” by Titus Maccius Plautus.
I believe this site holds some rattling good information for everyone : D.
This is really interesting, You are a very skilled blogger. I have joined your feed and look forward to seeking more of your great post. Also, I’ve shared your site in my social networks!
The other day, while I was at work, my sister stole my iPad and tested to see if it can survive a forty foot drop, just so she can be a youtube sensation. My iPad is now broken and she has 83 views. I know this is completely off topic but I had to share it with someone!
I truly enjoy studying on this website, it holds superb blog posts. “Never fight an inanimate object.” by P. J. O’Rourke.
Enjoyed studying this, very good stuff, appreciate it. “Management is nothing more than motivating other people.” by Lee Iacocca.
I love your blog.. very nice colors & theme. Did you create this website yourself? Plz reply back as I’m looking to create my own blog and would like to know wheere u got this from. thanks
Real fantastic information can be found on website.
Nice post. I learn something more challenging on different blogs everyday. It will always be stimulating to read content from other writers and practice a little something from their store. I’d prefer to use some with the content on my blog whether you don’t mind. Natually I’ll give you a link on your web blog. Thanks for sharing.
Very fantastic information can be found on site. “I don’t know what will be used in the next world war, but the 4th will be fought with stones.” by Albert Einstein.
My husband and i felt really delighted when Jordan could round up his investigations because of the precious recommendations he received out of the web pages. It’s not at all simplistic to simply choose to be offering secrets and techniques other people could have been selling. We do understand we need the blog owner to appreciate because of that. The most important illustrations you have made, the simple site menu, the relationships you help instill – it’s mostly great, and it’s really facilitating our son and the family believe that the situation is enjoyable, which is unbelievably important. Thanks for all!
I like this weblog so much, saved to bookmarks.
Hiya, I am really glad I have found this information. Nowadays bloggers publish just about gossips and web and this is really irritating. A good web site with interesting content, that’s what I need. Thank you for keeping this site, I’ll be visiting it. Do you do newsletters? Can’t find it.
I enjoy your piece of work, appreciate it for all the good posts.
I’m still learning from you, but I’m making my way to the top as well. I absolutely love reading everything that is posted on your website.Keep the stories coming. I liked it!
WONDERFUL Post.thanks for share..more wait .. …
I think this site has some real great info for everyone : D.
This website online is known as a walk-via for all the information you needed about this and didn’t know who to ask. Glimpse right here, and also you’ll positively discover it.
Wow, superb blog layout! How long have you been blogging for? you make blogging look easy. The overall look of your web site is fantastic, as well as the content!
Great goods from you, man. I’ve understand your stuff previous to and you’re just too magnificent. I actually like what you have acquired here, really like what you are stating and the way in which you say it. You make it entertaining and you still take care of to keep it sensible. I can not wait to read far more from you. This is actually a great web site.
I got what you intend, appreciate it for posting.Woh I am happy to find this website through google.
I am glad that I observed this website, precisely the right info that I was looking for! .
Great work! This is the kind of info that should be shared around the web. Shame on the seek engines for not positioning this publish upper! Come on over and seek advice from my site . Thank you =)
I am happy that I found this weblog, just the right information that I was searching for! .
Some times its a pain in the ass to read what website owners wrote but this web site is rattling user friendly! .
I loved as much as you will receive carried out right here. The sketch is tasteful, your authored subject matter stylish. nonetheless, you command get bought an nervousness over that you wish be delivering the following. unwell unquestionably come more formerly again since exactly the same nearly very often inside case you shield this hike.
Hey there, You have done an excellent job. I’ll definitely digg it and personally recommend to my friends. I am confident they’ll be benefited from this web site.
I truly value your piece of work, Great post.
I like this website very much, Its a very nice office to read and receive info . “Never hold discussions with the monkey when the organ grinder is in the room.” by Sir Winston Churchill.
Hello there, just became alert to your blog through Google, and found that it is really informative. I’m going to watch out for brussels. I’ll appreciate if you continue this in future. A lot of people will be benefited from your writing. Cheers!
Some really good content on this web site, thanks for contribution.
Hello very cool website!! Guy .. Beautiful .. Wonderful .. I will bookmark your site and take the feeds also…I am satisfied to search out numerous useful information here in the put up, we want work out more techniques in this regard, thank you for sharing. . . . . .
My brother recommended I might like this web site. He used to be entirely right. This put up truly made my day. You cann’t consider just how so much time I had spent for this information! Thanks!
The Pink Salt Trick is a minimalist but effective morning routine: Just drink a glass of lukewarm water mixed with a pinch of Himalayan pink salt as soon as you wake up.
Superb blog! Do you have any recommendations for aspiring writers? I’m hoping to start my own website soon but I’m a little lost on everything. Would you recommend starting with a free platform like Wordpress or go for a paid option? There are so many options out there that I’m totally overwhelmed .. Any suggestions? Thanks a lot!
The Pink Salt Trick is a minimalist but effective morning routine: Just drink a glass of lukewarm water mixed with a pinch of Himalayan pink salt as soon as you wake up.
Howdy very nice website!! Man .. Beautiful .. Amazing .. I will bookmark your site and take the feeds additionally?KI’m happy to search out a lot of helpful information right here within the put up, we need develop extra techniques in this regard, thank you for sharing. . . . . .
I have not checked in here for some time since I thought it was getting boring, but the last few posts are good quality so I guess I’ll add you back to my daily bloglist. You deserve it my friend 🙂
Hey just wanted to give you a quick heads up. The words in your content seem to be running off the screen in Chrome. I’m not sure if this is a format issue or something to do with web browser compatibility but I thought I’d post to let you know. The style and design look great though! Hope you get the problem resolved soon. Thanks
The Pink Salt Trick is a minimalist but effective morning routine: Just drink a glass of lukewarm water mixed with a pinch of Himalayan pink salt as soon as you wake up.
I have been absent for a while, but now I remember why I used to love this web site. Thanks , I will try and check back more frequently. How frequently you update your web site?
The Pink Salt Trick is a minimalist but effective morning routine: Just drink a glass of lukewarm water mixed with a pinch of Himalayan pink salt as soon as you wake up.
I’d have to examine with you here. Which is not one thing I usually do! I take pleasure in reading a post that may make folks think. Additionally, thanks for permitting me to comment!
Your place is valueble for me. Thanks!…
I am often to blogging and i really appreciate your content. The article has really peaks my interest. I am going to bookmark your site and keep checking for new information.
Hi! I’ve been reading your blog for a long time now and finally got the courage to go ahead and give you a shout out from Lubbock Texas! Just wanted to tell you keep up the excellent job!
This site is my intake, real superb pattern and perfect subject matter.
I will right away grab your rss feed as I can’t find your e-mail subscription hyperlink or newsletter service. Do you’ve any? Please allow me understand so that I may just subscribe. Thanks.
We are a bunch of volunteers and opening a brand new scheme in our community. Your web site provided us with valuable info to paintings on. You have performed a formidable job and our whole community will likely be thankful to you.